 Complete emergency water preparedness kit laid out for inspection
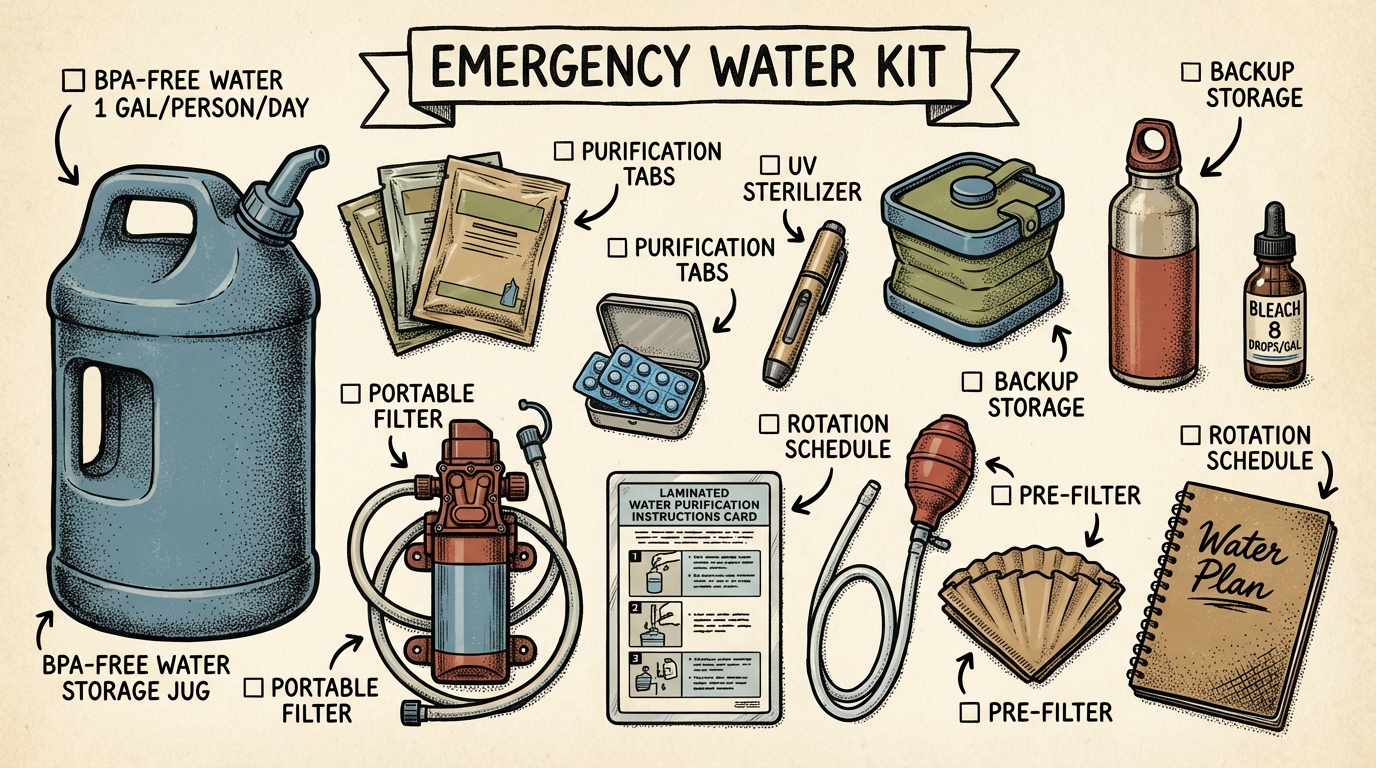
Emergency Water Preparedness Checklist
- Store at least 14 gallons of water per person for a two-week supply.
- Choose food-grade, BPA-free containers rated specifically for water storage.
- Own two purification methods: a gravity filter for home and portable filter for evacuation.
- Create a rationing plan and practice it before any emergency strikes.
- Map your three nearest freshwater sources within walking distance of home.
- Rotate stored tap water every 6–12 months or add preserver for 5-year storage.
I’ve responded to three major disaster scenarios in the Pacific Northwest where municipal water systems failed — the 2020 Labor Day fires in Oregon’s Santiam Canyon that contaminated a town’s reservoir with wildfire ash and chemical runoff, an ice storm that burst water mains across two counties in the Willamette Valley, and a flood that overwhelmed a treatment plant with agricultural runoff near Tillamook. In every single case, the people who fared best weren’t the ones with the fanciest gear. They were the ones who had a complete emergency water preparedness plan before the crisis started.
Water is the most critical resource in any emergency. You can survive weeks without food, but only about three days without water — and that timeline shrinks dramatically in heat, at altitude, or under physical stress. After 12 years of field experience in emergency management, FEMA training certifications, and maintaining my Wilderness First Responder credential continuously since 2014 with annual refresher training on austere-environment medical protocols, I can tell you with absolute certainty: water is the prep that makes or breaks everything else.
This guide isn’t a product review or a DIY sand filter tutorial. This is your complete emergency water supply strategy — the same framework I teach in county-level community preparedness workshops — covering storage, purification, rationing, sourcing, and the critical differences between sheltering in place and evacuating. Let’s build your plan.
Understanding Your Emergency Water Preparedness Needs
Before you buy a single container, you need to understand how much water your household actually requires. The standard recommendation from FEMA (outlined in their Emergency Water Supply Planning Guide, FEMA P-1054) and the CDC is one gallon per person per day for drinking and basic sanitation. But in my experience, that number is a survival minimum, not a comfort number.
Here’s how emergency preparedness water per person demand actually breaks down:
- Drinking: 0.5–1 gallon per day (more in hot climates or during physical exertion)
- Food preparation: 0.25–0.5 gallon per day (reconstituting freeze-dried meals, cooking rice or pasta)
- Basic hygiene: 0.25–0.5 gallon per day (hand washing, brushing teeth, sponge baths)
- Medical needs: Variable — wound cleaning, medication mixing, dialysis patients, or anyone managing diabetes or taking medications that require water intake can significantly increase usage
For realistic planning, I budget 1.5 gallons per person per day for temperate climates and 2 gallons per person per day for summer months or physically demanding situations. Don’t forget pets — dogs need roughly one ounce of water per pound of body weight daily.
How Much Water Should You Store at Home?
The CDC recommends a minimum three-day supply. I think that’s dangerously insufficient. Portland’s Bureau of Emergency Management now specifically recommends a two-week supply — 14 gallons per person — and my field experience backs that up completely. Municipal water system repairs after a major earthquake or contamination event routinely take one to four weeks. My baseline recommendation is a 14-day supply — that’s 14 gallons per person minimum, or 21 gallons per person if you use my 1.5-gallon daily figure.
For a family of four at the 14-day mark, you’re looking at 56 to 84 gallons of stored water. That sounds like a lot until you realize a single 55-gallon drum plus a few smaller containers gets you most of the way there.
Tier One: Home Water Storage for Shelter-in-Place
Your emergency water supply for home is the foundation of your plan. This is the water you’ll rely on when you’re sheltering in place — during an earthquake, winter storm, infrastructure failure, or contamination event.
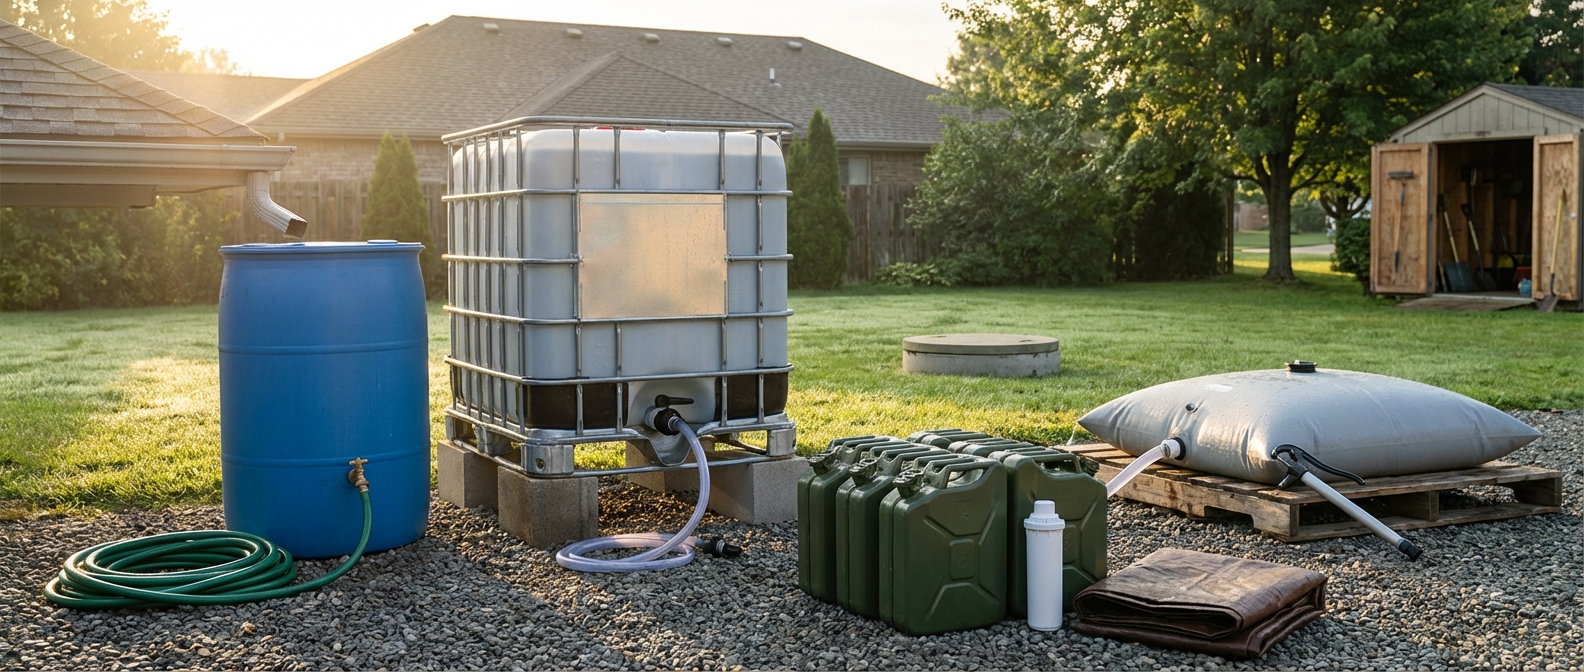
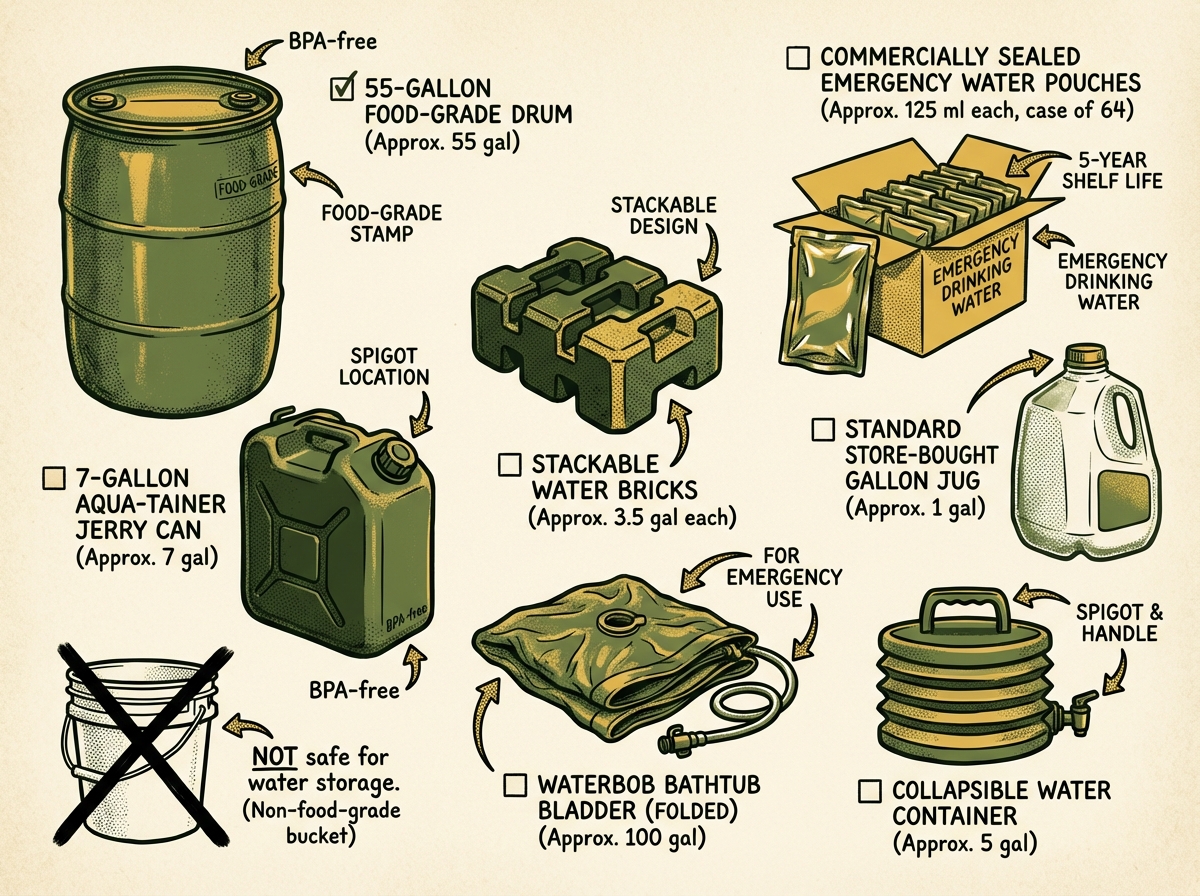
Common emergency water storage containers compared side by side
Choosing the Right Storage Containers
Not all containers are safe for long-term water storage. Here’s what I use and recommend:
55-Gallon Drums (Bulk Storage) These are the workhorses of home water storage. Buy only food-grade, BPA-free, HDPE plastic drums specifically rated for water. I keep two in my garage. They require a bung wrench to open and a siphon pump to extract water. Place them on a raised wooden platform — concrete floors can leach chemicals into plastic over time, and you want airflow underneath.
7-Gallon Rigid Containers (Portable Bulk) Products like the Reliance Aqua-Tainer or WaterBrick are excellent middle-ground options. At 7 gallons, they’re heavy when full (about 58 pounds) but still movable by one person. I keep four of these staged near my emergency supplies checklist gear for quick access.
Commercially Bottled Water (Convenient Baseline) Store-bought gallon jugs and cases of bottled water are the easiest entry point. They’re pre-sealed and treated, making rotation simple. I always keep at least two cases on hand.
Emergency Water Pouches (Long-Term and Grab-and-Go) Brands like Datrex, SOS, and Mainstay make individual water pouches rated for 5-year shelf life. They’re more expensive per ounce, but I keep a box of 64 pouches in each family member’s go-bag. They’re compact, virtually indestructible, and require zero rotation for years.
WaterBOB Bathtub Bladders (Fill-on-Warning) Keep one in a closet. When you get advance warning of a storm or infrastructure threat, fill your bathtub with up to 100 gallons of clean water before the system goes down.
Five Practical Ways to Store Water at Home
- Dedicated 55-gallon drums in a garage or basement, elevated off concrete on a wooden pallet
- Stackable water bricks (3.5-gallon each) arranged on shelving — great for apartments and small spaces
- Commercial bottled water rotated through regular household use (first in, first out)
- Emergency water pouches tucked into closets, vehicle kits, and go-bags
- A WaterBOB bathtub bladder kept ready for fill-on-warning situations
How to Store Water for the Long Term
If you want to store water for years without constant rotation, follow this protocol — it’s what I use for my own deep storage:
- Start with clean, municipally treated tap water. It already contains chlorine, which inhibits bacterial growth.
- Sanitize your container by rinsing with a solution of 1 teaspoon unscented liquid household bleach per quart of water. Swirl, let sit for 30 seconds, and drain completely.
- Fill completely, leaving minimal air space. Air introduces potential contaminants.
- Add water preserver concentrate (like Aquamira Water Treatment) if you want to extend storage beyond 12 months. This can push safe storage out to 5 years.
- Seal tightly, label with the date, and store in a cool, dark location. Basements are ideal. Avoid direct sunlight and temperature extremes.
- For 6- to 10-year storage, consider investing in a WaterPrepared 160- or 320-gallon tank specifically engineered for long-term emergency water storage.
Without preserver, rotate your tap water every 6 to 12 months. I mark rotation dates on my calendar — treat it like changing smoke detector batteries.
Emergency Water Preparedness Storage Containers Compared
In the water preparedness workshops I lead through my county emergency management partnership, the most common question I get is which container to actually buy. Here’s the comparison based on what I’ve tested and used in the field:
| Container Type | Capacity | Cost Per Gallon | Shelf Life | Portability | Best For |
|---|---|---|---|---|---|
| 55-Gallon Drum | 55 gal | $0.30–$0.50 | 5+ years (with preserver) | Low — needs pump | Suburban homes with garage/basement |
| WaterBrick | 3.5 gal | $1.50–$2.00 | 5+ years (with preserver) | High — stackable, 29 lbs full | Apartments, closets, shelving |
| Aqua-Tainer (7 gal) | 7 gal | $0.60–$1.00 | 6–12 months (tap water) | Medium — 58 lbs full | General home use, grab-and-go |
| WaterBOB Bathtub Bladder | 100 gal | $0.35 | Fill-on-warning only | None — stays in tub | Advance-warning events (storms, boil orders) |
| Emergency Water Pouches | 4.2 oz each | $3.00–$5.00 | 5 years | Very high | Go-bags, vehicle kits |
| Commercial Bottled Water | 0.5–1 gal | $1.00–$2.00 | 1–2 years | High | Immediate baseline supply |
| Large Capacity Tank (160–320 gal) | 160–320 gal | $0.25–$0.40 | 5–10 years | None — permanent install | Rural properties, serious preppers |
My recommendations by household type:
- Apartment dweller: WaterBricks on shelving + emergency pouches in go-bag + WaterBOB in closet
- Suburban home: Two 55-gallon drums + four 7-gallon Aqua-Tainers + bottled water cases
- Rural property: Large-capacity tank (160+ gallons) + 55-gallon drums + portable containers for vehicle
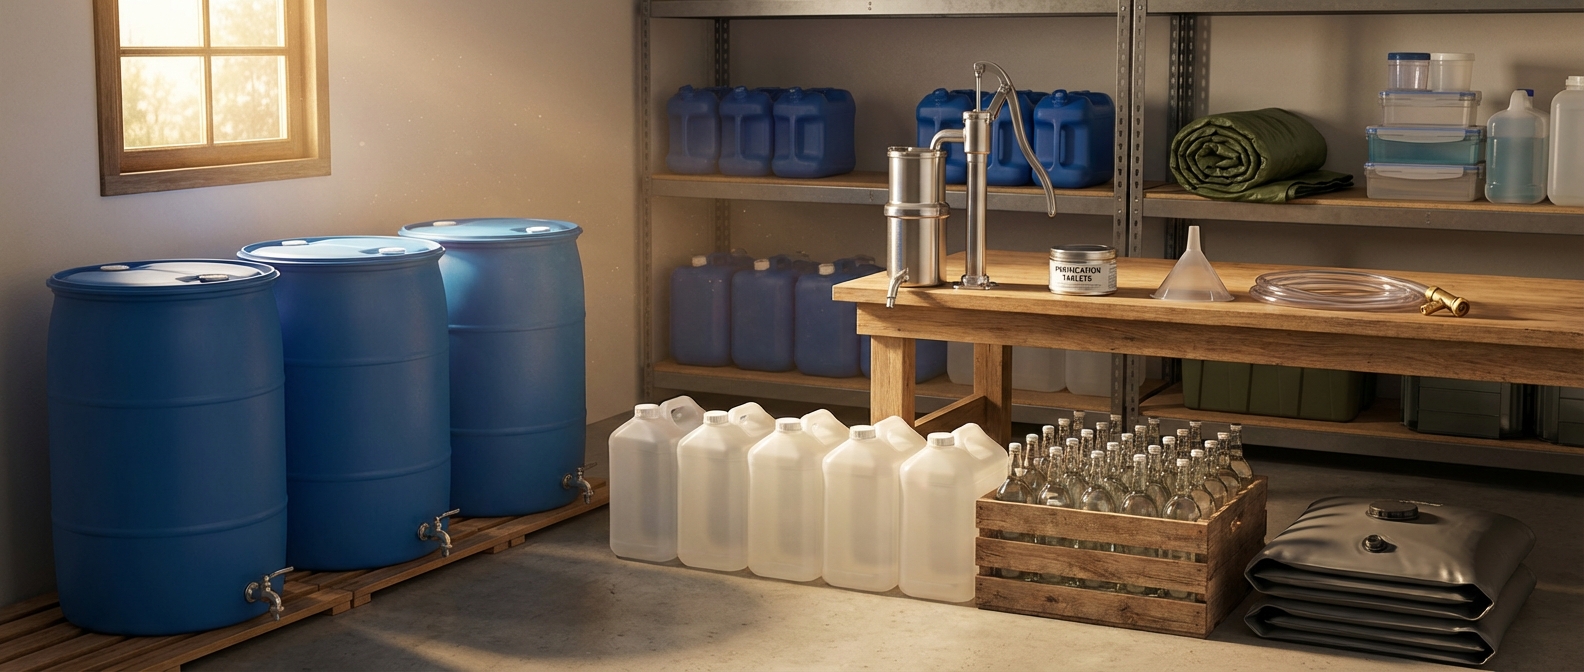
 A field station setup showing multiple water purification methods in action
Tier Two: Water Purification and Treatment Methods
Stored water will eventually run out. Your water purification emergency preparedness knowledge and tools are what carry you beyond that point. This tier is also critical if you need to use water from unfamiliar sources after a natural disaster.
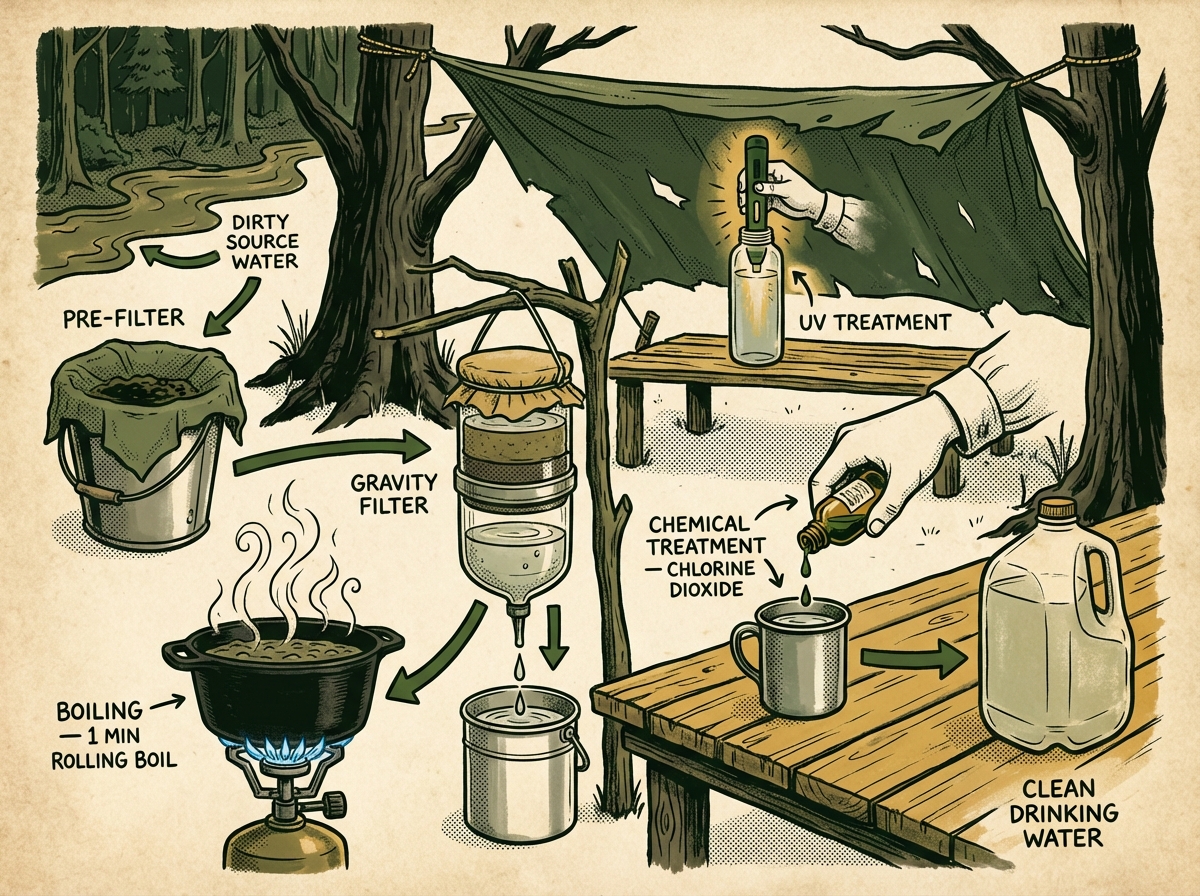
Pre-Filtering: The Step Most People Skip
Before applying any treatment method, you need to address turbidity — that’s cloudiness from sediment, dirt, or organic matter. Turbid water dramatically reduces the effectiveness of chemical treatment and UV purification because particles shield pathogens from contact with disinfectants and light. In my WFR training, we always pre-filter through a bandana, coffee filter, or improvised cloth filter folded into multiple layers before applying any treatment. This simple step can be the difference between effective purification and a false sense of security.
Boiling
The most reliable, universally accessible method. Bring water to a rolling boil for at least one minute (three minutes above 6,500 feet elevation). Boiling kills bacteria, viruses, and parasites including Cryptosporidium. It won’t remove chemical contaminants or heavy metals, but for biological threats — which are the primary danger after floods and infrastructure failures — it’s bulletproof.
I always keep a camp stove and fuel in my emergency supplies specifically for this purpose. If the power is out, you’ll need an alternative heat source — see my guide on power outage preparedness for options.
Chemical Treatment
Unscented liquid household bleach (6–8% sodium hypochlorite) is your most accessible chemical treatment. Add 8 drops per gallon of clear water or 16 drops per gallon of cloudy water. Stir and let stand for 30 minutes. You should detect a slight chlorine smell. If not, repeat the dose and wait another 15 minutes. Important: never use scented bleach, color-safe bleach, or bleach with added cleaners — they contain chemicals that are unsafe to ingest.
Water purification tablets (chlorine dioxide or iodine-based) are excellent for go-bags. I carry Potable Aqua chlorine dioxide tablets in every kit — they’re effective against Cryptosporidium, which regular bleach and iodine struggle with.
Filtration
Gravity filters like the Berkey or ProOne are outstanding for home use during extended emergencies. They handle bacteria, parasites, and many chemical contaminants without electricity or pumping. I’ve run my ProOne gravity filter through multi-week power outages and it performed flawlessly.
Portable pump or squeeze filters are essential for evacuation scenarios. During my Wilderness First Responder recertification in 2024, we tested six portable filters side-by-side on turbid creek water — the Sawyer Squeeze and MSR Guardian consistently outperformed in flow rate and clarity. My Sawyer Squeeze is my primary portable, and I keep chemical tablets as my secondary. The MSR Guardian is heavier but handles viruses — a significant advantage if you’re sourcing water in areas with potential sewage contamination.
UV Treatment
Devices like the SteriPEN use ultraviolet light to neutralize biological contaminants in about 90 seconds per liter. They’re lightweight and fast, but they require batteries or charging, only work with relatively clear water (pre-filter first), and won’t remove particulates or chemicals. I consider UV a useful supplement, not a standalone solution.
Contamination Type Matrix: What Each Method Actually Removes
| Threat | Boiling | Bleach | Chlorine Dioxide Tablets | Pump/Squeeze Filter | Gravity Filter | UV |
|---|---|---|---|---|---|---|
| Bacteria | ✅ | ✅ | ✅ | ✅ | ✅ | ✅ |
| Viruses | ✅ | ✅ | ✅ | ❌ (most filters) | ❌ (most) | ✅ |
| Protozoa (Giardia) | ✅ | ✅ | ✅ | ✅ | ✅ | ✅ |
| Cryptosporidium | ✅ | ❌ | ✅ | ✅ | ✅ | ✅ |
| Heavy Metals | ❌ | ❌ | ❌ | Some models | Some models | ❌ |
| Chemical Contaminants | ❌ | ❌ | ❌ | Activated carbon models | Activated carbon models | ❌ |
The gold standard for unknown water sources: boiling + filtering. Pre-filter sediment, run through a quality filter, then boil. This combination handles virtually every biological threat you’ll encounter.
Which Methods to Pair Together
- Home: Gravity filter + bleach as backup
- Evacuation: Portable filter + chemical tablets
- Vehicle kit: Water pouches + purification tablets
Tier Three: Sourcing Emergency Drinking Water
Knowing where to find water when your stored supply runs out is the piece most people skip entirely. Don’t be most people.
 Hidden emergency water sources inside a typical home
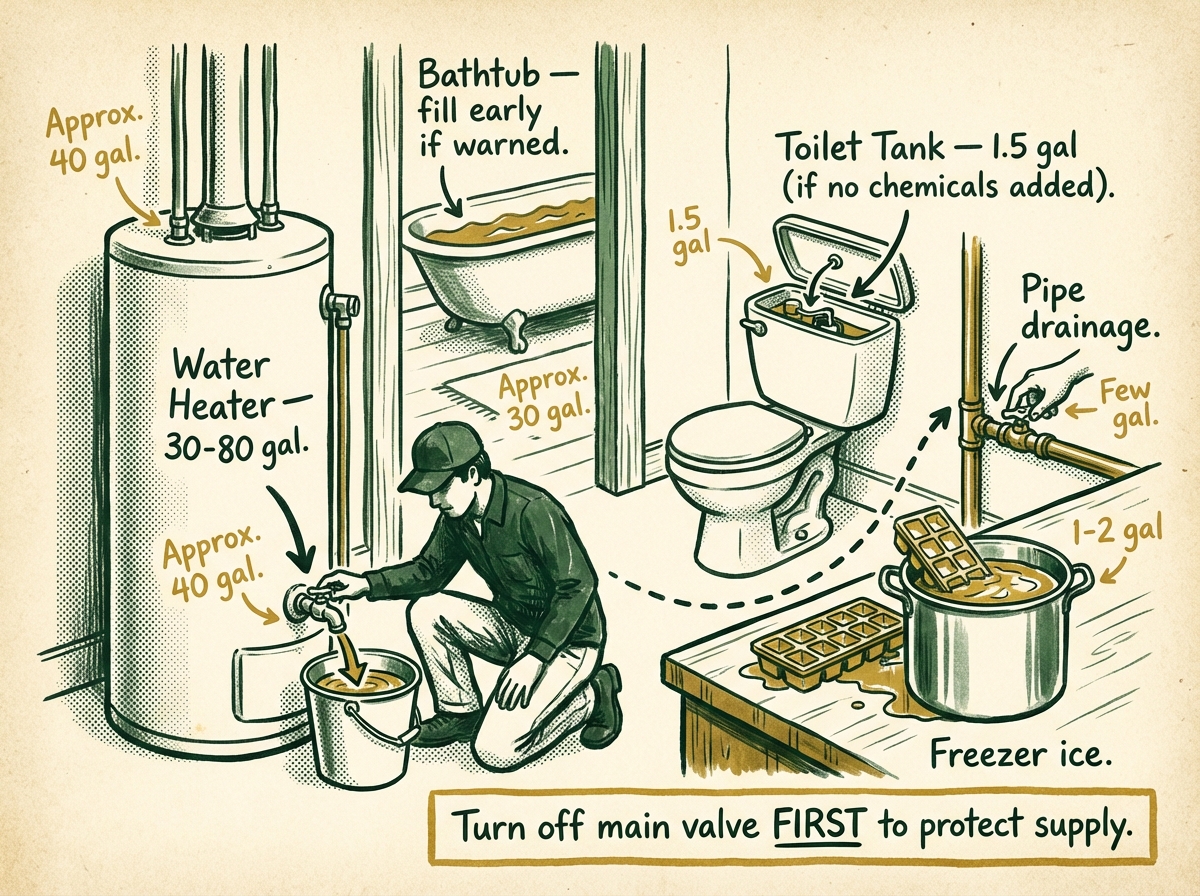
Indoor Sources You Already Have
Before venturing outside, tap these household sources:
- Water heater tank: Most hold 30–50 gallons of usable water. Turn off the power or gas to the heater first, then drain from the valve at the bottom. Let it cool if necessary. One note: older water heaters can accumulate sediment buildup at the bottom of the tank — drain the first quart or two and discard it if it looks murky or has visible particles.
- Toilet tanks (not bowls): The tank behind the toilet holds clean water, provided you haven’t used chemical tank cleaners or drop-in tablets. Usually 1.5–3 gallons per tank.
- Pipe drainage: Open the highest faucet in your home to allow air in, then collect water from the lowest faucet. You may get several gallons.
- Ice cubes and frozen items: Your freezer likely holds usable water in the form of ice.
Outdoor Sources
After indoor sources are exhausted, you’ll need to identify outdoor water. This is where purification becomes non-negotiable. Never drink untreated water from any outdoor source during an emergency — contamination risk skyrockets after disasters.
Prioritize sources in this order:
- Rainwater collection — the cleanest natural source. Set up tarps, clean buckets, or purpose-built rain barrels. Still filter or treat before drinking.
- Flowing streams and rivers — moving water is generally safer than standing water. Collect upstream from any human activity.
- Natural springs — excellent if you know their location. Map these in your area now.
- Lakes and ponds — usable but higher risk of contamination. Always filter and treat.
- Swimming pools and hot tubs — last resort. The chemical load is high, but the water is usable if processed through a quality filter with activated carbon. Do not rely on pool water for more than a few days.
Water Sources to Absolutely Avoid
- Floodwater — always contaminated with sewage, agricultural chemicals, petroleum, and debris. I’ve seen this firsthand in Tillamook — what looks like “just muddy water” is loaded with pathogens and toxic compounds.
- Water near industrial sites — chemical contamination that no portable filter can fully address.
- Radiator fluid or any automotive fluids — toxic and lethal even in small amounts.
- Any water with unusual color, chemical odor, or oily surface film — trust your senses.
Disaster-Specific Sourcing Warnings
Different disasters create different contamination profiles:
- After earthquakes: Broken sewer and water lines often cross-contaminate each other. Even if water flows from your tap, it may be unsafe. Wait for a boil-water advisory to be lifted before trusting municipal supply. See my guide on how to prepare for an earthquake for more details.
- After floods: Treat ALL surface water as contaminated — period. Agricultural runoff carries pesticides, fertilizers, and animal waste. Sewage overflow is virtually guaranteed.
- After wildfires: Ash and fire-retardant chemical contamination in nearby streams and reservoirs can persist for months. During the 2020 Santiam Canyon fires, reservoir contamination was so severe that the water system couldn’t be restored for weeks.
Action step: This weekend, pull up a topographic map of your area and identify the three nearest freshwater sources within walking distance of your home. Write them down and add them to your family emergency plan.
Rationing: Making Your Emergency Water Supply Last
During the 2020 ice storms in Oregon, I watched families burn through a week’s worth of stored water in three days because they had no rationing plan. Don’t let this happen to you.
Basic Water Rationing Protocol
- Days 1–3: Full allocation (1–1.5 gallons per person per day). Maintain hydration and morale.
- Days 4–7: Reduce to survival minimum (0.5–1 gallon per person per day for drinking only). Minimize cooking water by eating ready-to-eat foods. Stop all non-essential water use.
- Days 7+: Stretch to 0.5 gallon per person per day if resupply is uncertain. Prioritize vulnerable members. Begin actively sourcing and purifying supplemental water.
Critical warning: Never restrict water intake below 0.5 gallon per person per day. Below that threshold, kidney stress and heat illness become serious and potentially life-threatening risks. Rationing is about smart allocation, not deprivation.
Priority Allocation: Children, Elderly, and Medical Needs
Children and elderly people dehydrate faster and show symptoms more quickly. They should receive priority water allocation — not reduced rations. Anyone on medications that increase urination (diuretics, certain blood pressure medications), people with diabetes, and those running a fever all need increased water, not less. If someone in your household requires dialysis, plan for substantially higher water needs and consult their medical team about emergency protocols.
Recognizing Dehydration Before It Becomes Dangerous
As a Wilderness First Responder, I was trained to use urine color as the most reliable field indicator of hydration status — pale yellow means adequately hydrated, dark amber means you need to increase intake immediately regardless of your rationing protocol. Other warning signs to watch for:
- Dark urine — the earliest and most reliable indicator
- Dizziness or lightheadedness when standing
- Dry mouth and decreased saliva
- Rapid heartbeat at rest
- Confusion or irritability — this signals severe dehydration and requires immediate action
If anyone in your household shows these signs, increase their water allocation immediately. No rationing schedule is worth a medical emergency.
Conservation Tactics That Actually Work
- Use hand sanitizer instead of water for hand cleaning when possible
- Eat foods that don’t require water to prepare — shelf-stable emergency food is ideal here
- Collect condensation from plants or improvised solar stills if conditions allow
- Reuse lightly used water — hand-washing water can flush a toilet
- Stay cool and minimize exertion to reduce water loss through sweat
 Space-efficient water storage solutions sized for apartment living
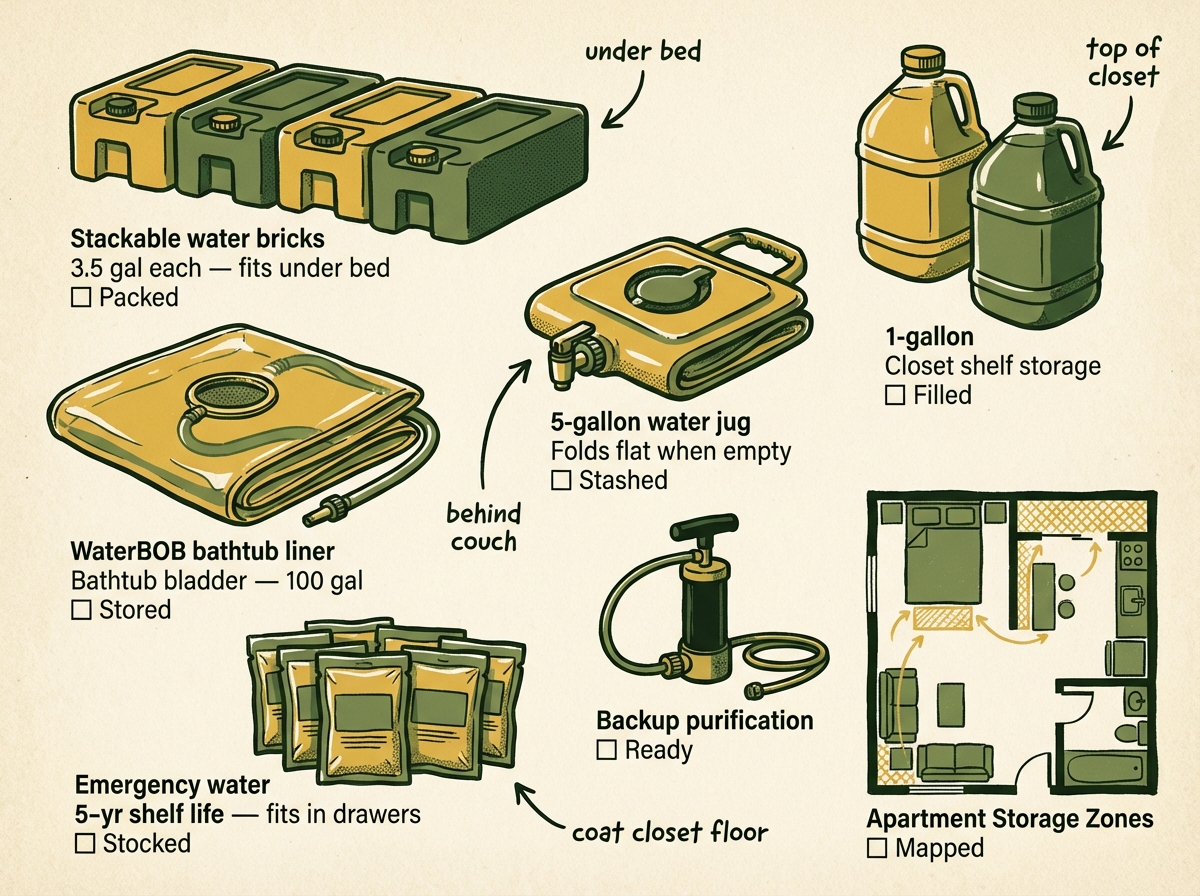
Emergency Water Preparedness for Apartments and Small Spaces
Most water storage advice assumes you have a garage, basement, or sprawling rural property. But in the community workshops I teach, roughly half the attendees are apartment dwellers or renters with limited space. Here’s how to build a solid emergency water plan in under six square feet of floor space.
Realistic Storage Targets for Small Spaces
For a two-person apartment, your minimum target is 28 gallons (14 gallons per person for two weeks). That sounds impossible in a 700-square-foot apartment until you break it down:
- Eight WaterBricks (3.5 gallons each) = 28 gallons. These stack neatly on a closet shelf, under a bed, or in the bottom of a coat closet. Eight bricks stacked in a 2×4 configuration take up roughly 2 square feet of floor space and stand about 18 inches tall.
- Alternative layout: Four 7-gallon Aqua-Tainers stored two under the bed and two in a closet corner. Same 28 gallons, slightly larger footprint but more portable.
Space-Saving Strategies I Recommend
- Under-bed storage: Flat-profile containers or WaterBricks slide under most bed frames. This is dead space you’re probably not using.
- Closet floor and shelving: Stack WaterBricks on the floor of a coat closet or on a reinforced shelf. They look neat and take up less room than you’d think.
- WaterBOB for fill-on-warning: Keep one in a linen closet. When a storm warning hits, fill your bathtub for up to 100 gallons. This costs nothing in daily living space.
- Rolling 7-gallon container: A single Aqua-Tainer fits in a coat closet and can be rolled to the door if you need to evacuate.
- Countertop gravity filter instead of a full-size Berkey: A smaller ProOne or Travel Berkey takes up about the same space as a coffee maker and provides the same filtration capability for a two-person household.
Apartment-Specific Considerations
- Weight limits: Water is heavy — 8.3 pounds per gallon. Verify that your shelving can handle the load before stacking. A shelf holding eight WaterBricks is supporting about 230 pounds.
- Landlord communication: Stored water doesn’t violate any lease I’ve ever seen, but if you’re concerned, water bricks look no different than storage containers.
- Evacuation priority: In an apartment, you may need to evacuate vertically (fire) or horizontally (building damage). Keep your go-bag with portable water and filter near the door, not buried behind your water storage.
Emergency Water Preparedness for Evacuation
Everything changes when you have to leave. You can’t take 55-gallon drums with you. Your evacuation water strategy needs to be lightweight, portable, and paired with sourcing capability.
What to Carry
In your bug out bag essentials, I recommend:
- 2–3 liters of water in durable bottles (Nalgene or stainless steel)
- Emergency water pouches — pack 12–24 individual pouches (weighs about 3–5 pounds)
- Portable water filter (Sawyer Squeeze weighs only 3 ounces)
- Backup chemical treatment (50 chlorine dioxide tablets weigh almost nothing)
- Collapsible water container (Platypus or HydraPak 2L soft bottle) for collecting and carrying water from sources along your route
Vehicle Kit Water
Keep a minimum of 3 gallons in your vehicle at all times, plus a portable filter and treatment tablets. I use commercially sealed gallon jugs and rotate them seasonally. In summer heat, check jugs for integrity — high temperatures can degrade plastic and cause leaks.
Common Emergency Water Storage Mistakes to Avoid
In the water preparedness workshops I lead, I see the same mistakes repeated across hundreds of households. Here are the ones that can genuinely put your family at risk:
1. Using non-food-grade containers. Repurposed milk jugs, old detergent bottles, and random plastic containers can leach chemicals into your water or harbor bacteria in scratches that are impossible to sanitize. Only use containers marked HDPE (recycling #2) that are specifically rated for food or water storage.
2. Placing drums directly on concrete. Concrete can leach chemicals into plastic over months and years. It also sweats in temperature changes, creating moisture that promotes mold. Always place drums on a wooden pallet or raised platform.
3. Using scented or additive bleach for treatment. Only plain, unscented household bleach with 6–8% sodium hypochlorite is safe for water treatment. Scented bleach, color-safe bleach, or bleach with added surfactants contains chemicals you absolutely should not ingest.
4. Ignoring rotation schedules. I’ve tested water stored in garages for 18+ months without rotation — it often develops off-tastes, cloudiness, and in some cases visible biofilm. Set calendar reminders. Treat it like an oil change.
5. Storing water near gasoline, solvents, or pesticides. Vapors from chemicals can permeate through plastic containers over time. I’ve seen this in garages where gas cans sit two feet from water drums. Store water in a separate area, or at minimum ensure six feet of distance and good ventilation.
6. Relying on a single purification method. Every method has limitations. Filters clog. Batteries die. Bleach degrades over time. I always carry a minimum of two independent purification methods, and I recommend you do the same.
7. Forgetting pets and medical needs. Your 50-pound dog needs about 50 ounces of water daily. Medications, wound care, infant formula preparation, and medical conditions like diabetes all increase water demand. Account for every member of your household — including the ones with four legs.
How Long Will 500 Gallons of Water Last?
This is a question I get frequently in workshops. At one gallon per person per day:
- One person: ~500 days (roughly 16 months)
- Two people: ~250 days (about 8 months)
- Family of four: ~125 days (approximately 4 months)
At a more realistic 1.5 gallons per person per day:
- One person: ~333 days
- Two people: ~167 days
- Family of four: ~83 days
Five hundred gallons is an excellent target for serious preparedness. You can achieve it with a combination of 55-gallon drums, stackable containers, and a large-capacity storage tank. The key is having both the storage and the rotation or preservation plan to keep it viable.
Frequently Asked Questions
How long will 500 gallons of water last for one person?
At the standard one gallon per person per day, 500 gallons lasts a single person approximately 500 days — well over a year. At a more realistic 1.5–2 gallons per day that accounts for cooking, hygiene, and warmer climates, you’re looking at 250–333 days. For a family of four at one gallon each, 500 gallons covers about 125 days. Factor in pets and medical needs and adjust accordingly.
How to store 2 weeks of water?
Store at least 14 gallons per person. Use food-grade containers like 7-gallon Aqua-Tainers, BPA-free 55-gallon drums, or commercially sealed WaterBricks. Fill with municipal tap water (already treated with chlorine), sanitize containers first using the CDC-recommended bleach rinse method, label with the date, and store in a cool, dark location. Rotate every 6–12 months if using plain tap water, or add water preserver concentrate to extend storage up to 5 years.
Why do cardiologists say don’t drink bottled water long-term?
Some cardiologists have raised concerns about microplastics found in single-use plastic bottles, which emerging research suggests may contribute to cardiovascular inflammation over time. For long-term daily hydration, filtered tap water is generally recommended. However, for emergency preparedness purposes, commercially bottled water remains a safe and practical option — the risk from dehydration in a crisis far outweighs any concern about microplastics during short-term emergency use.
How often should you replace emergency water?
Tap water stored in clean, food-grade containers with residual chlorine should be rotated every 6 to 12 months. Commercially bottled water is generally safe for 1–2 years past its printed date. Specialty emergency water pouches from brands like Datrex or Mainstay carry a 5-year shelf life rating. Water stored with preserver concentrate in properly sealed food-grade containers can last 5–10 years. Mark your containers with fill dates and set calendar reminders.
What is the best water filter for emergency preparedness?
For home use, I recommend a gravity filter like the ProOne or Berkey — no electricity, no pum