Solar Power for Preppers: A Practical Guide to Emergency Energy
Quick answer
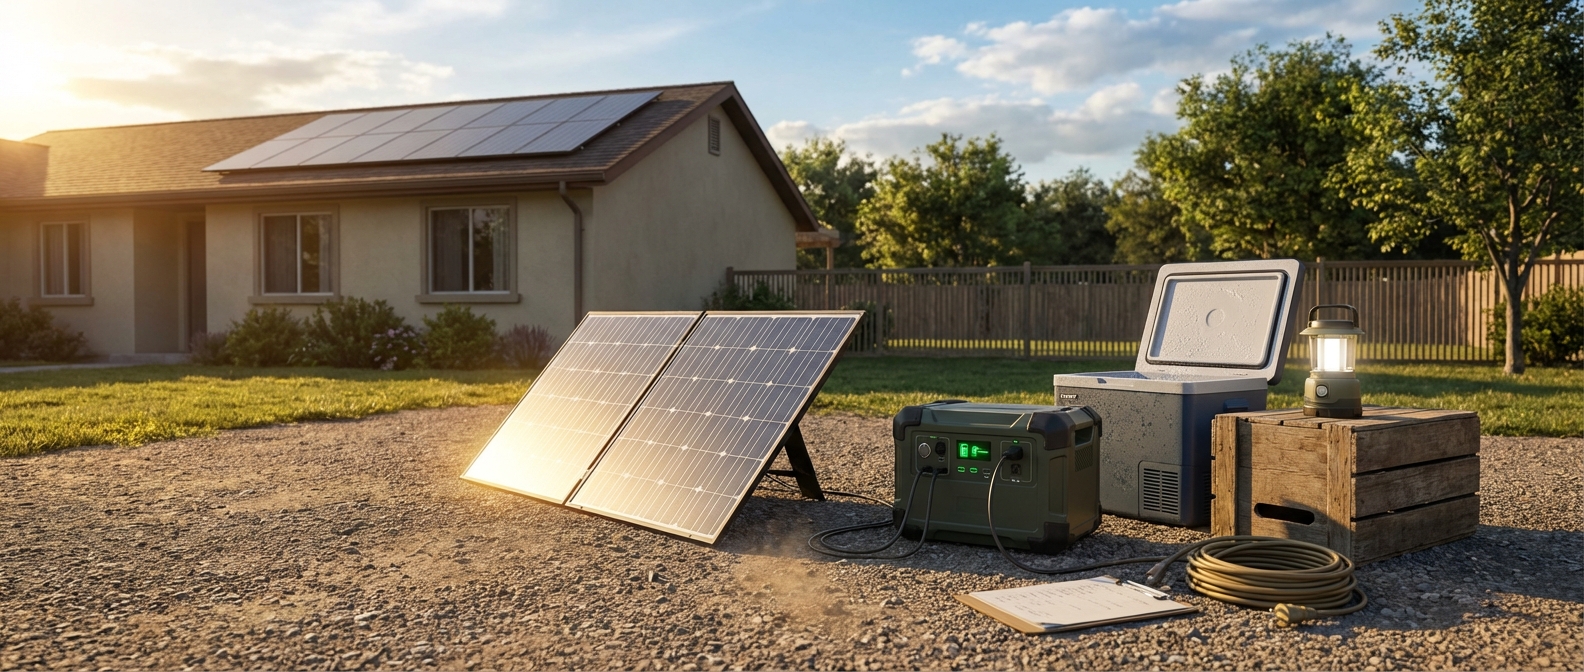
- Solar power for preppers delivers quiet, fuel-free energy for essential devices during outages. Start with a small portable kit (panel + MPPT charge controller + battery + inverter or a portable power station) sized to your critical loads and expand from there.
- Sizing rule of thumb: panel watts ≈ (daily Wh ÷ peak sun hours) ÷ system efficiency. Battery usable Ah = (daily Wh × days of autonomy) ÷ (system voltage × DoD).
- Prioritize communications, medical devices, lights, and refrigeration. Use MPPT controllers, pure sine inverters, and LiFePO4 batteries when your budget allows.
What solar power for preppers delivers
- No fuel hauling and fewer resupply trips. You get energy every day the sun shines.
- Quiet operation and lower visibility than gasoline generators. That helps operational security.
- Systems scale from pocket chargers to full-house backups.
Battery note: solar systems need storage for night and cloudy days. For heavy or prolonged loads, pair solar with a generator or another charging source.
Key concepts
- PV panel: converts sunlight into DC electricity.
- Peak sun hours: average equivalent hours per day at 1000 W/m2. Use local insolation tools to find this.
- Watt (W) vs Watt-hour (Wh): W measures instant power. Wh measures energy over time.
- Charge controllers:
- PWM: simple and inexpensive, fine for small panels.
- MPPT: harvests more energy, especially from higher-voltage arrays or in variable conditions.
- Batteries:
- Lead-acid (AGM or flooded): lower cost, heavy, roughly 50% usable depth of discharge.
- LiFePO4: higher upfront cost, long cycle life, 80 to 90% usable capacity, usually includes a BMS. Check the datasheet.
- BMS: protects and balances lithium cells.
- DoD (depth of discharge): percent of battery capacity you can use. Shallow cycles extend life.
- Inverter: converts DC to AC. Use pure sine for medical or sensitive electronics.
- Transfer switch or subpanel: lets you safely switch household circuits to backup power.
How to size a starter system
- Make a list of critical devices and estimate hours per day.
- Calculate Wh/day for each device: Watts × hours.
- Add the device totals to get Daily Wh. Add 20 to 30 percent margin.
Formulas
-
Panel watts (approx): Panel_Watts = (Daily_Wh ÷ Peak_Sun_Hours) ÷ System_Efficiency
- Use system efficiency around 0.65 to 0.85; 0.75 is a conservative choice.
-
Battery usable capacity (Ah): Usable_Ah = (Daily_Wh × Days_of_Autonomy) ÷ (System_Voltage × DoD)
Example
- Loads: LED light 10 W × 5 h = 50 Wh; phone charger 15 W × 2 h = 30 Wh; fan 40 W × 4 h = 160 Wh; radio 5 W × 6 h = 30 Wh. Total = 270 Wh/day.
- Add 25% margin → 338 Wh/day. Peak sun = 4 h, efficiency = 0.75. Panel_Watts ≈ (338 ÷ 4) ÷ 0.75 ≈ 113 W. Choose a 150 W panel for headroom.
- For 1 day autonomy on 12 V with DoD 50%: Usable_Ah ≈ (338 × 1) ÷ (12 × 0.5) ≈ 56 Ah. Pick a 100 Ah battery for reserve.
Core components and practical recommendations
-
Solar panels: monocrystalline panels pack more power per area. Use rigid rooftop panels for permanent installs and folding panels for bug-out kits. Check warranty, temperature coefficient, and IP rating.
-
Charge controller: choose MPPT for most prepper systems. Size it by the array’s max current and the system voltage.
-
Battery bank: LiFePO4 gives the best lifecycle and usable capacity for long-term emergency setups. Use lead-acid only when cost and weight are limiting factors. Confirm whether the battery includes a BMS.
-
Inverter: pick a pure sine inverter for medical devices and other sensitive gear. Match continuous and surge ratings to the biggest loads you plan to run at once. Use an inverter-charger if you want integrated generator or grid charging.
-
Safety and integration: use correctly sized fuses, breakers, and appropriately gauged cable. Follow manufacturer wiring diagrams and local electrical code. Install a transfer switch or interlock and a dedicated essential-circuit subpanel. Choose UL or ETL listed equipment when possible.
Example beginner systems
-
Small portable starter for renters or testing:
- 100 to 200 W of panels
- 20 to 30 A MPPT controller
- 12 V ~100 Ah battery or a portable power station
- 300 to 1000 W pure sine inverter if AC is required
-
Mid-range DIY home backup:
- 400 to 800 W array
- MPPT controller sized to the array
- 48 V LiFePO4 battery bank
- 2000 to 3000 W pure sine inverter for selected circuits
-
Full residential backup: size the system to your essential loads and consult a licensed electrician for permits and installation.
Cost expectations
- Entry-level portable kits: about $200 to $1,000 depending on brand and features.
- Mid-range DIY emergency systems: roughly $800 to $3,000. Battery chemistry drives much of the cost difference.
- Full installed residential systems: highly variable. Get local quotes and review incentives.
Step-by-step setup checklist
- Prioritize critical loads: phone charging, radio, lights, medical devices, refrigerator if needed.
- Calculate Daily Wh and add margin.
- Choose system voltage: 12 V for small systems, 24 or 48 V for larger banks. Pick battery chemistry.
- Size battery capacity and panel wattage using the formulas above.
- Select an MPPT controller and an inverter sized for continuous and surge requirements.
- Mount panels with the correct tilt and orientation and avoid shading.
- Wire with fuses and breakers per manufacturer guidance and install a transfer switch or interlock.
- Test the system under load and rehearse startup and shutdown procedures.
Portable solar for bug-out or vehicle kits
-
Useful gear: folding panels (100 to 200 W) plus a compact MPPT controller; portable power stations with integrated batteries and inverters; USB and 12 V chargers or small LiFePO4 power banks for repeated phone and GPS charging.
-
Use case: good for communications, lights, and low-draw electronics. Not suitable for running full-size appliances for extended periods.
Maintenance and seasonal planning
- Keep panels clean and free of shade. Partial shading cuts output sharply.
- Watch battery health: monitor voltage trends, terminal corrosion, swelling, and temperature.
- Inspect wiring, connectors, and fuses on a regular schedule.
- Adjust for seasons. Winter brings shorter days and lower solar angles. Expect reduced output.
- Run blackout drills to verify runtime and procedures. Practice reveals weak points quickly.
Standards and reference tools
- Use NREL solar maps and insolation data to find peak sun hours for your location.
- Read manufacturer datasheets for MPPT specs, battery capacity and DoD, BMS behavior, and inverter ratings.
- Follow local building and electrical codes for permits, transfer-switch rules, and interconnection requirements.
FAQ: solar power for preppers
Q: What battery is best for a prepper solar system? A: LiFePO4 usually delivers the best balance of usable capacity and cycle life for emergency setups. Lead-acid costs less up front but offers fewer effective cycles.
Q: Do I need an inverter? A: You need an inverter for AC appliances. For phones, radios, and many comms devices, DC output or a portable power station may be enough.
Q: Can solar replace a generator? A: Solar can replace a generator for low to moderate loads when paired with batteries. Generators still make sense for high, on-demand loads or fast recharging during long cloudy stretches. Many people keep both for redundancy.
Practical next steps
- Calculate your essential Wh/day and set a first-phase target, such as phone charging, a radio, and two LED lights for 24 hours.
- Buy a small portable kit or build a basic 12 V system and test it now. Practice beats panic.
- Expand in phases: add panels, upgrade batteries, and integrate essential circuits as real needs become clear and local codes are followed.
Solar power for preppers works. Start small, measure real performance, and scale the system to match your needs.