Prepper Storage Solutions: Maximize Space & Protect Your Supplies
Quick summary
- Prepper storage solutions organize, protect, and rotate emergency supplies so they stay usable and accessible.
- Start with one labeled bin or shelf. Use airtight food-grade containers, vertical shelving, and a simple inventory.
- Inspect and rotate supplies every 3 to 6 months. Keep one or more grab-and-go kits near exits.
Key takeaway
Prepper storage solutions are practical container choices and layouts that keep food, water, medical supplies, tools, and documents safe from moisture, pests, heat, and physical damage. Measure your space, choose durable food-safe containers, label clearly, and use First In, First Out rotation. Begin small and expand as you learn what fits your home.
Definitions
- prepper storage solutions: systems and containers for storing food, water, medical supplies, tools, and documents to protect them from moisture, pests, heat, and damage.
- Food-grade bucket: plastic bucket rated for food contact. Often paired with a gamma lid for easy access.
- Mylar bag: metallized polyester bag used with oxygen absorbers to reduce light and oxygen exposure for dry foods.
- Oxygen absorber: sachet that removes oxygen to slow oxidation and deter pests.
- Desiccant: moisture-absorbing packet, for example silica gel, to control humidity.
- FIFO: First In, First Out rotation to prevent waste.
Why it matters
Good storage prevents lost supplies. Moisture ruins dry goods. Rodents chew through poor packaging. Heat shortens the shelf life of medicines and batteries. Organize items so you can grab what you need quickly.
Use vertical shelving to free floor space. Store water away from chemicals and sunlight. Keep high-priority items at arm level. These small choices make a kits-and-supplies system reliable.
Shelf life varies by item and conditions. Check product labels and manufacturer guidance.
Assess your home before you buy
- Measure and map storage zones. Record height, width, depth, door clearances, and shelf weight capacity.
- Match items to environment:
- Food: cool, dry, dark locations.
- Water: out of sunlight and away from chemicals.
- Medications: stable temperature areas.
- Tools: near exits or workspaces for quick access.
- Organize by access level: daily-access, short-term kits (72-hour), and long-term reserves.
- Note environmental risks: temperature swings, high humidity, and pest entry points.
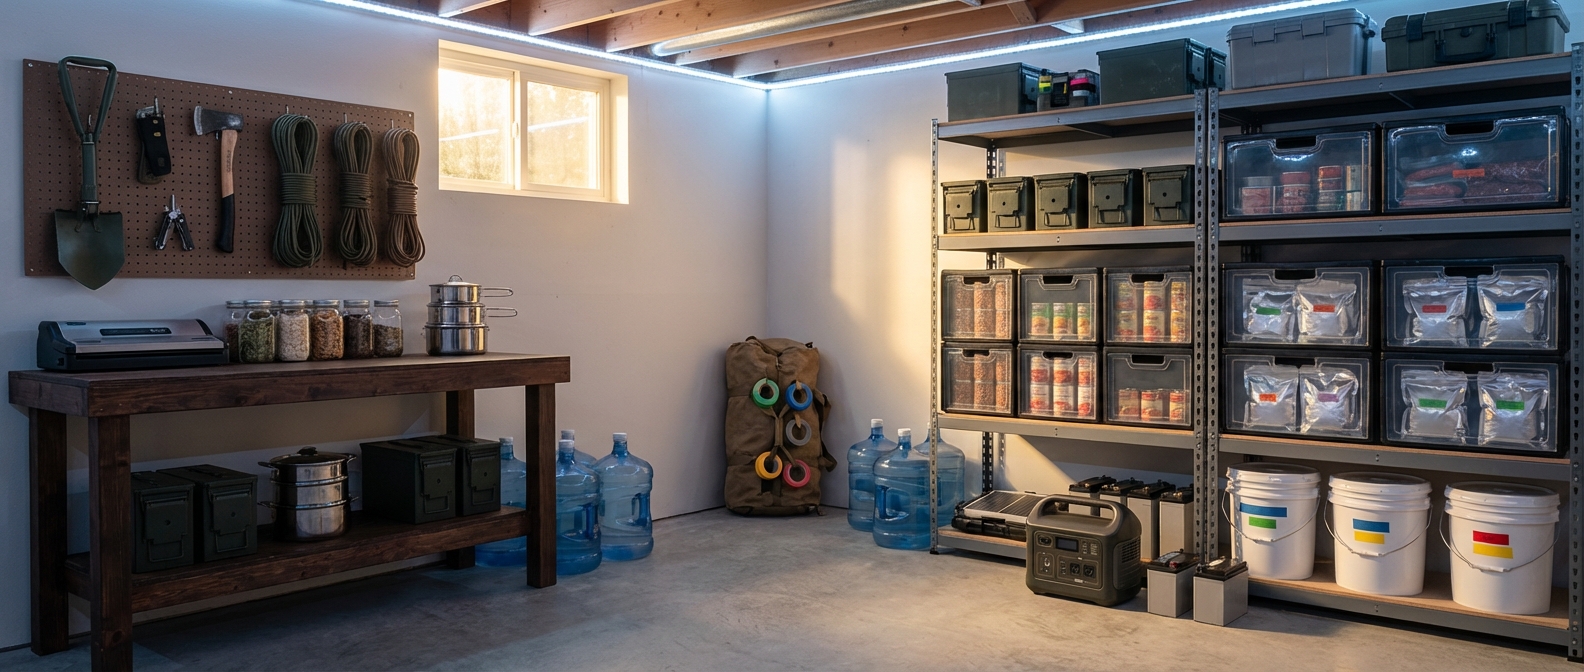
Best prepper storage solutions: what to use and where
1) Vertical shelving and racking
Use metal or heavy-duty plastic shelving with clear weight ratings. Anchor shelves to walls when possible. Ideal items include canned goods, stackable bins, and bulk dry goods stored in airtight containers. Choose adjustable, rust-resistant units.
2) Airtight, stackable food storage
Options include food-grade buckets with gamma lids, Mylar bags plus oxygen absorbers, and airtight pantry jars. Add desiccants in high-humidity areas. Label contents and pack or purchase dates.
3) Under-bed and hidden storage
Low-profile bins fit under beds and hold freeze-dried pouches, spare blankets, and flat kits. Concealed furniture, such as storage ottomans or benches, doubles as usable space when room is tight.
4) Closet conversion and over-the-door organizers
Hanging shelves, stackable bins, and over-the-door pockets hold small items like headlamps and water purification tablets. Reserve top shelves for lightweight, infrequently used items.
5) Wall-mounted organizers and pegboards
Pegboards, hooks, and shallow labeled bins keep tools, radios, and gear visible and reachable.
6) Discreet and secure storage
Locked cabinets, small safes, or false-bottom drawers work for cash and sensitive documents. Record secure locations in your inventory so you can find them quickly.
How to organize and maintain supplies
Categorize by function
Water, food, cooking and fuel, medical, lighting, sanitation, shelter and warmth, tools and repair, communications, security, and bug-out gear.
Labeling and inventory
Label bins on multiple sides with: Category | Contents | Date packed | Use-by or expiration.
Keep a simple CSV-friendly inventory. Example:
item_name,quantity,location,pack_date,expiry_date,reorder_threshold,notes Rice (5kg),2,Basement Shelf A,2025-02-01,2030-02-01,1,Mylar+OA First Aid Kit,1,Hall Closet,2024-09-01,2026-09-01,1,Check meds quarterly
Review inventory every 3 to 6 months. Inspect for pests, moisture, and damage.
Rotation (FIFO)
Place newer items behind older ones and mark dates on labels. Keep rotation simple and consistent.
Grab-and-go zones
Prepare quick-access kits for outages or evacuation: first aid, flashlight, spare batteries, emergency radio, water pouches, basic tools, and copies of important documents. Store these kits near primary exits.
Common mistakes and how to fix them
- Buying supplies before planning storage. Measure and map first.
- Using attics or uninsulated garages for temperature-sensitive items. Move those items to a stable area or add climate control and desiccants.
- Storing everything in one place. Spread supplies across multiple zones to reduce single-point failure.
- Neglecting rotation. Schedule recurring checks and mark dates clearly.
- Using flimsy containers or undersized shelving. Invest in durable, rated solutions.
- Making emergency items hard to reach. Keep high-priority items at arm level or in dedicated quick-access bins.
FAQ
Q: What are the most effective storage solutions for preppers? A: Vertical shelving, airtight food containers like food-grade buckets and Mylar with oxygen absorbers, under-bed bins, closet organizers, and grab-and-go kits.
Q: How often should I check my prepper storage? A: Inspect every 3 to 6 months for pests, moisture, and expirations. Rotate stock as needed.
Q: What should new preppers store first? A: Water, shelf-stable food, a basic first aid kit, flashlights and batteries, hygiene items, and basic cooking and sanitation gear. Follow FEMA and CDC guidance for emergency kits.
Quick checklist to get started (30 to 60 minutes)
- Measure one shelf or closet and clear it.
- Place labeled bins for water, food, medical, and tools.
- Add one grab-and-go kit near an exit.
- Create a simple inventory CSV or spreadsheet and log items.
- Schedule the first inventory review in 3 months.
Start with one shelf, a few durable containers, and a simple inventory. Protect supplies from moisture, pests, and heat. Make them easy to reach and rotate regularly. Build from there.
Resources
- Becoming a Prepper: The Beginner’s Guide to Survival Readiness
- Water, Water Everywhere: How to Store H2O Without Losing Your Sanity
- Canned Goods and Other Edibles: Your First Steps to Stockpiling Food
- How to Build a Bug Out Bag: Essentials for a Quick Getaway
Shelf life and temperature guidance vary by product. Check labels and manufacturer recommendations.