DIY Compost Toilet for Emergencies: Build, Use, and Maintain a Safe Bucket Toilet
TL;DR
- A basic DIY compost toilet (bucket-style) gives emergency waste containment, controls odors and flies, and preserves household hygiene when plumbing fails.
- Essentials: a sturdy 5-gallon bucket with a secure lid, a seat or simple frame, and a dry carbon cover such as sawdust, coco coir, peat, or wood shavings.
- Routine: add cover after every use, manage liquids, swap or seal the bucket before it is overfilled, and follow local public-health guidance for disposal or approved composting.
Overview
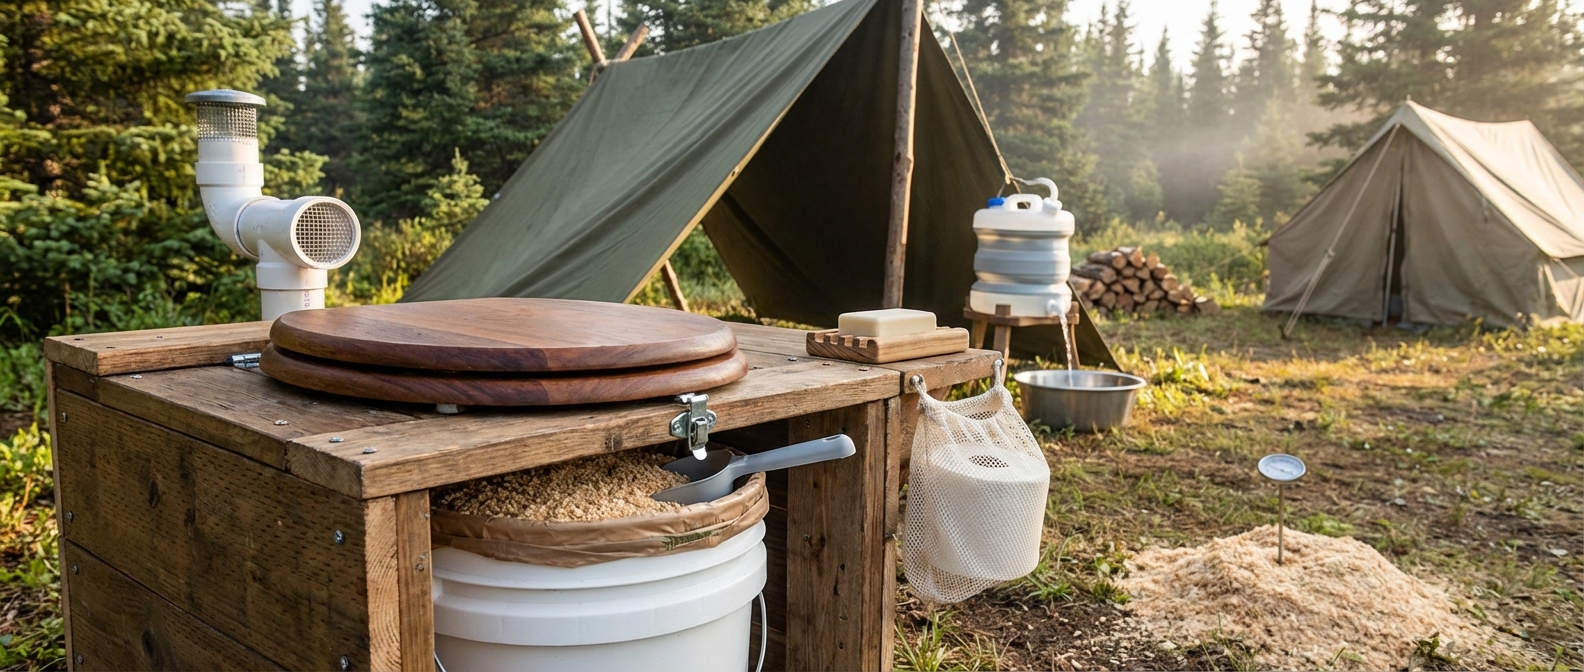
A DIY compost toilet, commonly a bucket toilet, is a low-water emergency sanitation option you can build from common materials. Use it to keep waste contained, reduce odors and flies, and protect household water and health. This does not produce garden-ready compost. Safe reuse requires proper thermophilic composting, monitoring, and local approval.
Definitions
- DIY compost toilet / bucket toilet: a 5-gallon bucket or similar container fitted with a seat and topped with dry carbon after each use.
- Dry toilet: a toilet that operates without water for flushing. A bucket toilet is one type.
- Carbon cover material: absorbent materials with high carbon content, such as sawdust, coco coir, peat, fine wood shavings, or dry leaves.
- Urine-diverting dry toilet (UDDT): separates urine from feces to reduce moisture in the solids container.
- Thermophilic composting. High-temperature composting around 55°C / 131°F reduces pathogens but requires deliberate design and monitoring.
Claims and sources
- Water savings depend on household behavior and fixture type. Treat any specific percentage as an estimate.
- Authoritative resources: CDC, EPA, local public-health departments, university extension services, and practical references such as the Humanure Handbook. Consult local rules before disposing or reusing humanure.
Materials needed (at a glance)
Essentials
- 1 sturdy 5-gallon food-grade bucket with a tight lid
- Bucket-compatible toilet seat or a seat mounted on a simple wooden box or frame
- Carbon cover material: dry sawdust, coco coir, peat, fine wood shavings, or dry leaves
- Small scoop or cup for dispensing cover
- Hand sanitizer or a handwashing station
- Gloves and disinfectant for cleaning
Optional but useful
- Heavy-duty liners or certified compostable bags
- Secondary bucket or extra liners for swapping
- Urine-diverting insert
- Vent pipe or a small odor-control fan
- Privacy tent or enclosure
- Absorbent additives such as powdered coir, peat, or wood ash
Step-by-step: build and use a basic emergency bucket compost toilet
- Pick the toilet body
- Use a clean, dry, crack-free 5-gallon bucket with a tight lid.
- For comfort and stability, set the bucket inside a simple wooden box or frame that accepts a standard seat.
- Install the seat
- Some seats snap onto buckets. Test stability before use.
- For box or frame setups, make sure the bucket fits snugly and the seat is secure.
- Add an initial carbon layer
- Put 2 to 3 inches of dry carbon cover in the bottom to absorb moisture and start odor control.
- Decide on a liner (optional)
- Liners make transfer easier and reduce cleaning. Use heavy-duty or certified compostable bags. Avoid thin plastics that tear.
- Set up a cover-material station
- Keep a sealed container of dry carbon and a scoop next to the toilet.
- After every use, add enough cover material to completely hide the waste.
- Swap and seal before overfilling
- Replace or seal the bucket when it reaches about 50 to 66 percent full. Tie off liners or secure lids and store sealed waste in a dry, protected area until disposal or until it enters an approved composting process.
Rules of use
- Solids: cover deposits fully with carbon after every use.
- Urine: add a smaller scoop of absorbent material. Use urine diversion for longer-term setups.
- Lid: close the lid after each use.
- Hygiene: wash or sanitize hands immediately after handling.
Managing liquids and moisture
- Keep the contents relatively dry. Add more carbon if the mix appears wet.
- Reduce liquids entering the bucket where possible. A urine-diverting insert lowers moisture and odors.
Long-term composting and reuse
- Human waste requires deliberate composting before safe reuse. Thermophilic systems that reach sustained high temperatures, documented time at temperature, and proper handling reduce pathogens.
- Contact your local extension service or public-health department before applying any compost derived from human waste to soil or plants.
How it works: basics and safety
- Microbes break down organic matter when carbon, nitrogen, oxygen, moisture, and time are balanced.
- An emergency bucket toilet focuses on containment, odor control, and hygiene rather than instant pathogen elimination.
- Human waste can contain pathogens such as E. coli, Salmonella, and norovirus. Minimize contact, avoid contaminating water sources, and maintain hand hygiene.
Maintenance checklist
- After every use: add cover material, close the lid, and sanitize hands.
- Keep cover material dry and sealed between uses.
- Monitor fill level and swap or seal at roughly half to two thirds full.
- Clean the seat and exterior regularly with disinfectant while wearing gloves.
- If odors increase: add dry carbon, check moisture, and improve ventilation.
Troubleshooting (common issues)
- Smell. Usually from excess moisture or too little cover. Add dry carbon, keep the lid closed, and improve ventilation.
- Flies. Caused by exposed waste or poor seals. Cover deposits fully, use liners, and ensure lids fit.
- Wet contents. Reduce liquids, add absorbent material, consider urine diversion, or empty more often.
Safety, regulations, and when to upgrade
- For short-term emergency containment, a bucket compost toilet is practical and effective when used correctly.
- Regulations vary by jurisdiction. Check municipal or county health departments before disposal or reuse.
- For long-term use or for producing reusable humanure, invest in an engineered composting system designed to reach and sustain thermophilic temperatures and follow published protocols.
Resources and references
- CDC and EPA disaster sanitation guidance
- Local public-health departments and extension services
- The Humanure Handbook. Use it as a practical guide and verify recommendations with local authorities.
FAQ
Q: What basic supplies do I need? A: A 5-gallon bucket with a lid, a compatible seat or box/frame, dry carbon cover, a scoop, gloves, and hand-hygiene supplies.
Q: Is it safe to use indoors during an outage? A: Yes, if you provide privacy and ventilation, use cover material after every use, and have a plan to seal and dispose of contents following local guidance.
Q: Can I compost bucket waste for gardening? A: Not immediately. Composting human waste for safe reuse requires proper time, temperature, and handling, plus local approval.
Practical next steps
- Assemble a DIY compost toilet kit before an emergency: bucket, seat, cover material, scoop, liners, and gloves.
- Practice using it and set aside a sealed storage area for full containers.
- Contact local public-health authorities or extension services for disposal rules and approved composting methods.
[INTERNAL_LINK: Becoming a Prepper: The Beginner’s Guide to Survival Readiness] [INTERNAL_LINK: Water, Water Everywhere: How to Store H2O Without Losing Your Sanity] [INTERNAL_LINK: Canned Goods and Other Edibles: Your First Steps to Stockpiling Food]